WooStore App Documentation
Welcome to the documentation for WooStore Multivendor Flutter App. This guide will walk you through setting up, configuring, and publishing your application.
1. Flutter Setup (Windows & Mac)
For Windows
- Download the Flutter SDK from the official website.
- Extract the zip file and place the
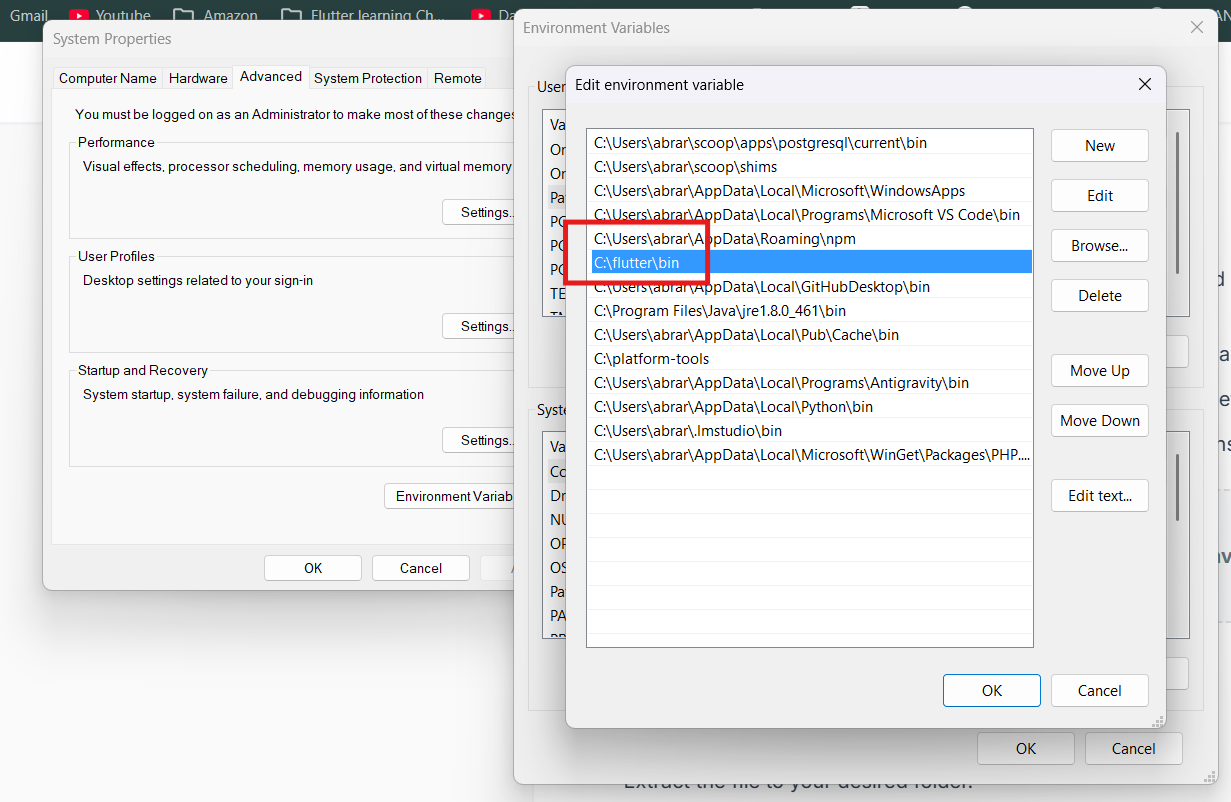
flutterfolder in your desired location (e.g.,C:\src\flutter). - Add the Flutter
bindirectory to your System Environment Variables (Path). - Install Android Studio and set up the Android SDK and Virtual Device (Emulator).
- Open command prompt and run
flutter doctorto verify the installation.
For Mac (macOS)
- Download the Flutter SDK for macOS from the official website.
- Extract the file to your desired folder.
- Add the Flutter tool to your path by editing your
~/.zshrcor~/.bash_profile:export PATH="$PATH:`pwd`/flutter/bin" - Install Xcode from the Mac App Store.
- Install Android Studio for Android development.
- Run
flutter doctorin your terminal.
2. Download App from CodeCanyon
After purchasing from CodeCanyon, download the zip file and extract it. Inside, you will find:
- Flutter Source Code folder.
- WordPress Plugin zip file.
- Documentation.
Open the Flutter source code folder using Android Studio or VS Code.
3. WordPress Plugin Setup
Our app requires a companion WordPress plugin to handle custom API endpoints.
- Go to your WordPress Admin Dashboard.
- Navigate to Plugins > Add New > Upload Plugin.
- Upload the plugin zip file provided in your CodeCanyon download.
- Activate the plugin.
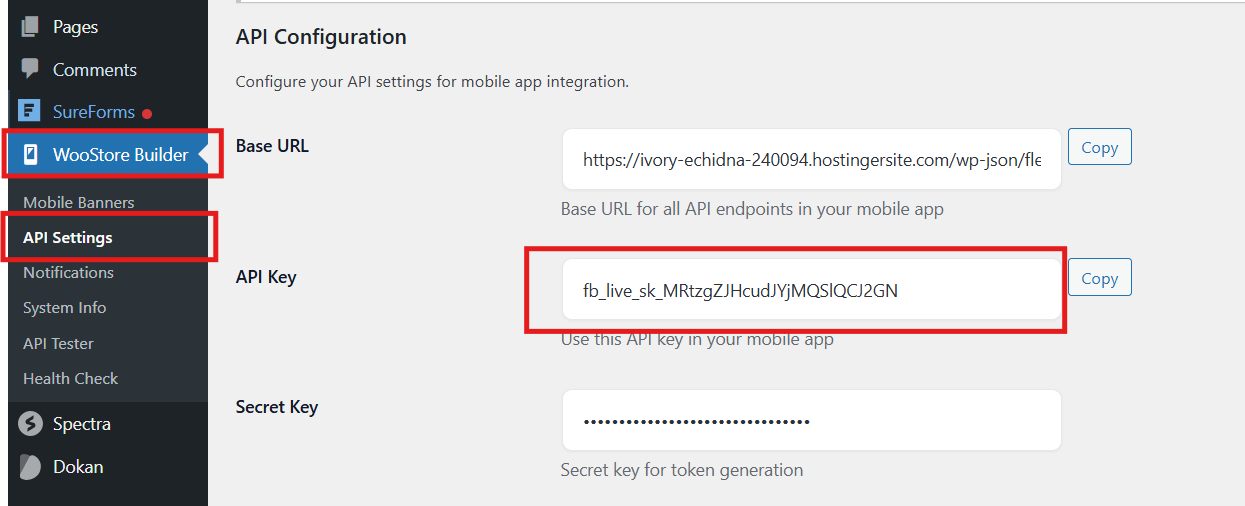
- Go to the plugin settings page to configure your app layout and get the Plugin API Key.
4. WooCommerce REST API Setup
You need to generate API keys in WooCommerce to connect the app.
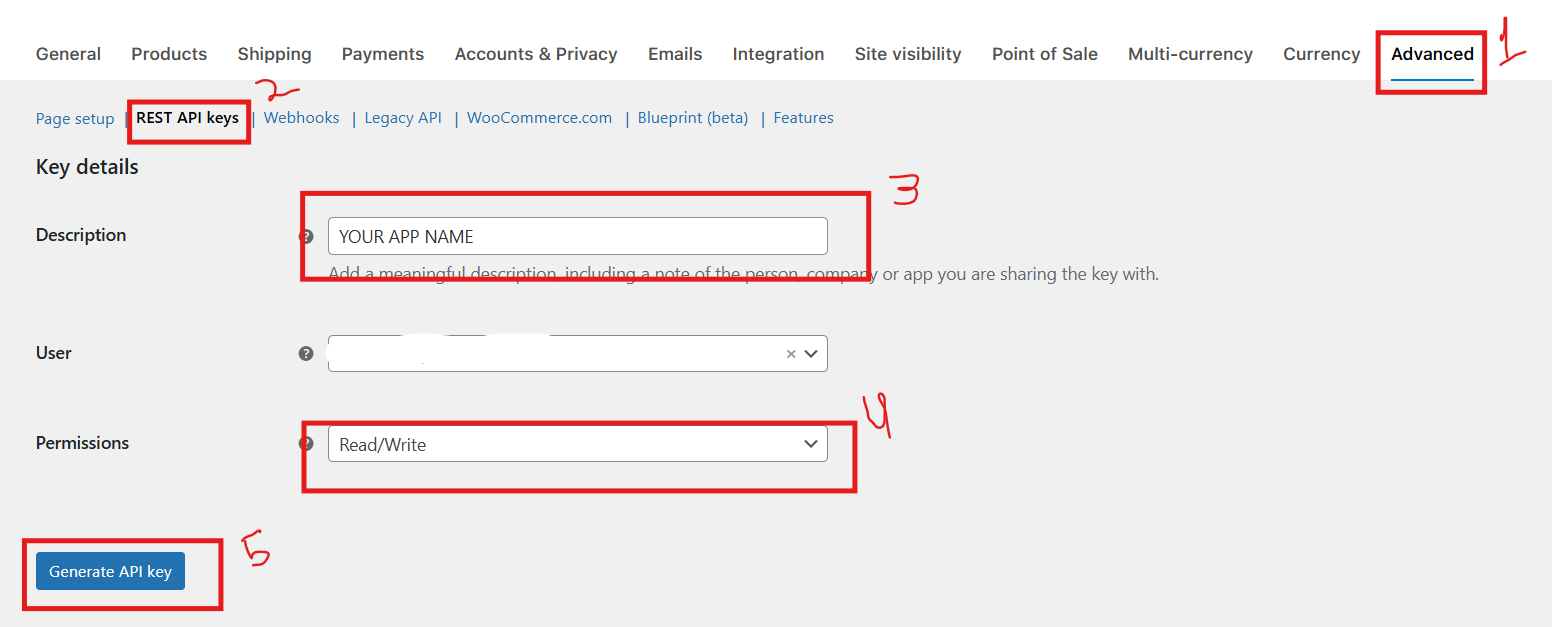
- Go to WooCommerce > Settings > Advanced > REST API.
- Click Add key.
- Description: "App Key", User: Admin, Permissions: Read/Write.
- Click Generate. Copy the Consumer Key and Consumer Secret.
Additionally, if your hosting provider (like Hostinger or Cloudflare) has strict "Bot Protection" or "WAF (Web Application Firewall)" enabled, it will block the app's API requests and return a 403 error ("Checking your browser before accessing"). You must disable Bot Protection for the REST API to function correctly.
5. Setup Domain, Purchase Code, and Connect App
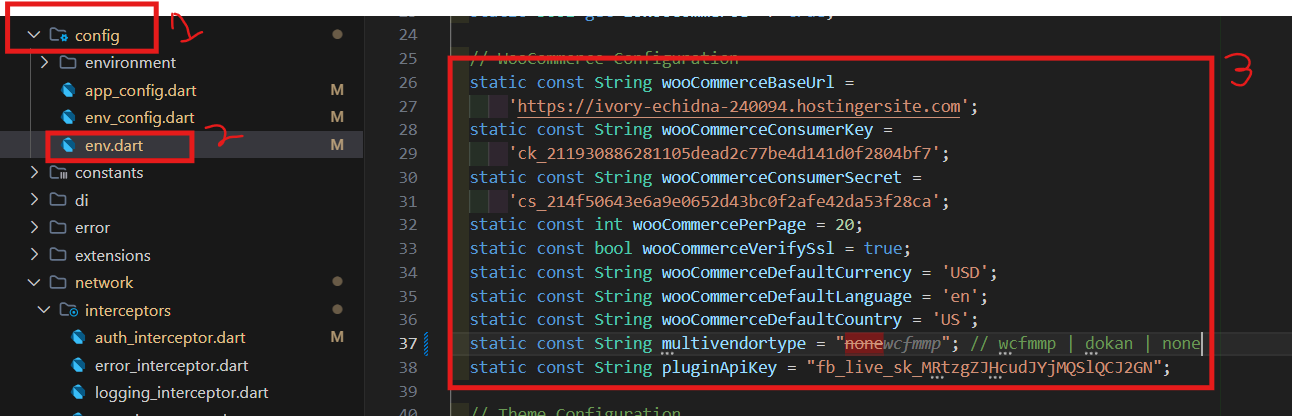
Open the Flutter project in your IDE. Navigate to lib/core/config/env.dart.
Update the following variables with your details:
class AppEnvironment {
  // Add your website URL
  static const String wooCommerceBaseUrl = 'https://yourwebsite.com';

  // Add keys generated in WooCommerce
  static const String wooCommerceConsumerKey = 'ck_your_key_here';
  static const String wooCommerceConsumerSecret = 'cs_your_secret_here';

  // Add your plugin API Key
  static const String pluginApiKey = "your_plugin_api_key_here";

  // App Purchase Code from CodeCanyon (if applicable for validation)
  static const String purchaseCode = "your-purchase-code";
}
6. How to run app in Android
- Open the project in Android Studio / VS Code.
- Open a terminal in the project root and run:
flutter pub get - Start an Android Emulator or connect a physical device via USB (enable USB debugging).
- Select the device from the bottom right corner (VS Code) or top toolbar (Android Studio).
- Run
flutter runor click the Play button.
7. How to run app in iOS (Mac only)
- Ensure Xcode is installed.
- Open terminal in project root and run:
flutter pub get - Navigate to the iOS folder:
cd ios - Install pods:
pod install - Open the iOS Simulator or connect an iPhone.
- Return to the project root and run:
flutter run
8. Setup Firebase (Push Notifications & Social Login)
Firebase setup is mandatory for Push Notifications and Social Login. We recommend using the official FlutterFire CLI for automatic configuration.
Step 1: Install Firebase CLI & FlutterFire
- Install the Firebase CLI for your OS.
- Log into Firebase via terminal:
firebase login
- Install FlutterFire CLI globally:
dart pub global activate flutterfire_cli
Step 2: Generate SHA-1 and SHA-256 Keys
To use Google Sign-In and Phone Auth, you must generate SHA keys and add them to Firebase.
- Windows: Open terminal, go to the android folder, and run:
cd android
gradlew signingReport
- Mac / Linux: Open terminal, go to the android folder, and run:
cd android
./gradlew signingReport
Copy the `SHA1` and `SHA-256` keys from the `debug` or `release` variant. You will paste these into your Firebase Console under Project Settings > Your Apps.
Step 3: Configure Firebase in App
Run the following command in the root of your Flutter project and follow the prompts to select your Firebase project and platforms (Android/iOS):
flutterfire configure
This command will automatically download and place `google-services.json` and `GoogleService-Info.plist` in the correct folders, and generate `firebase_options.dart`.
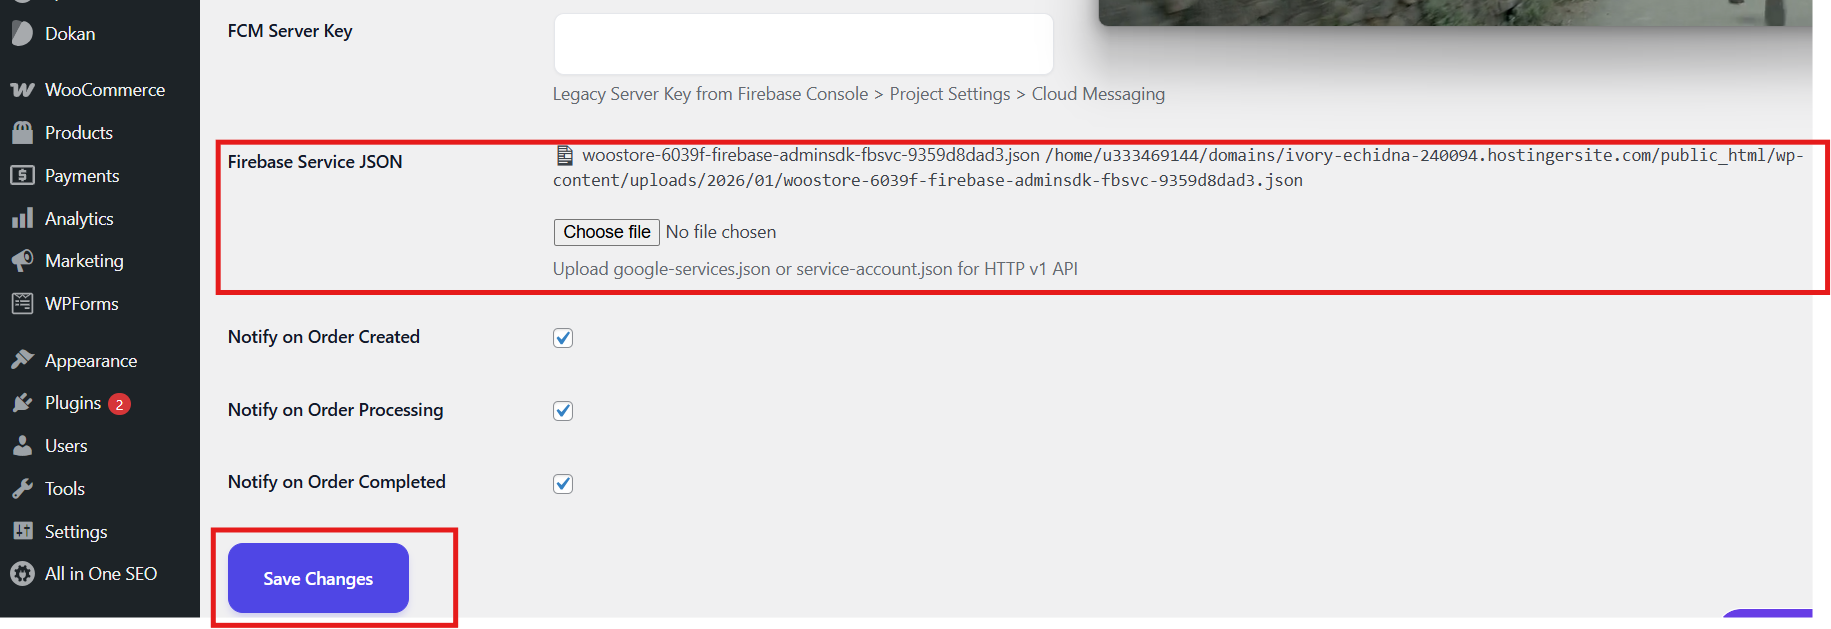
Step 4: Generate Service Account JSON for WordPress
To send Push Notifications automatically when orders update, you must link your WordPress Plugin to Firebase.
- Go to Firebase Console > Project Settings > Service accounts.
- Click Generate new private key. This will download a `.json` file to your computer.
- Go to your WordPress Admin Dashboard.
- Navigate to the WooStore Plugin Settings > FCM Notification Settings.
- Upload the `.json` file you just downloaded and click Save.
9. App Customization (Icon, Name, Logo, Colors)
Change App Icon
Replace the icon images in assets/icon/ and run the following command in terminal:
flutter pub run flutter_launcher_icons
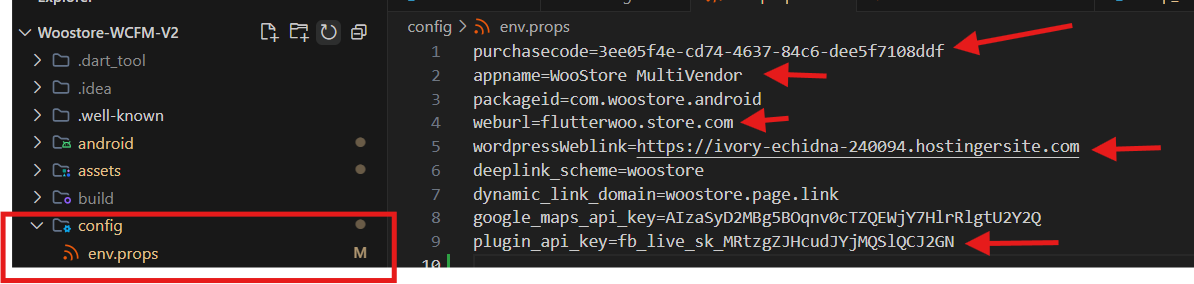
Change App Name
Open the config/env.props file in the root of your project and change the appname
property:
appname=Your Awesome App
This single change will automatically update the app name for both Android and iOS.
Change Logo inside App
Replace the logo files in assets/images/ (e.g., logo.png). Ensure the name remains the
same.
Change App Colors and Fonts
Open lib/core/config/env.dart to change primary and secondary colors:
static const String primaryColor = '#7C3AED';
static const String secondaryColor = '#7C3AED';
Change Onboarding Screen Images and Text
Open assets/config/en_config.json (or your language config) and locate the "onboarding"
object. Change the text and image paths.

Change Web URLs (Privacy, Terms, About)
In lib/core/config/env.dart, update the supportLinks map:
static const Map<String, String> supportLinks = {
  "privacyPolicy": "https://yourwebsite.com/privacy",
  "termsConditions": "https://yourwebsite.com/terms",
  "aboutUs": "https://yourwebsite.com/about",
};
10. Setup Payment Methods
To enable/disable payments, edit lib/core/config/env.dart:
static const bool enableStripe = true;
static const bool enableRazorpay = true;
static const bool enablePayPal = true;
static const bool enableCashOnDelivery = true;
static const bool enableBankTransfer = true;
Add your API keys in the respective variables (stripekey, razorpaykey,
paypalkey) in the same file.
11. Setup Webview or Native Checkout
In lib/core/config/env.dart, you can toggle between Native UI checkout and Webview checkout:
// checkout options
static const bool nativeCheckout = false;
static const bool webviewCheckout = true;
Set webviewCheckout to true to load your website's checkout page seamlessly inside the
app.
12. Setup Social Login (Google & Apple)
To enable users to log in with their social accounts, you must configure authentication providers in Firebase.
1. Setup Google Sign-In
- Go to Firebase Console > Authentication > Sign-in method.
- Click Add new provider and select Google.
- Enable it, choose a support email, and click Save.
- Important: As shown in Section 8, you MUST add your
SHA-1andSHA-256keys to your Android App settings in Firebase, otherwise Google Sign-In will fail with an error. - Run
flutterfire configureagain if you added the SHA keys after your first configuration.
2. Setup Apple Sign-In
- Go to your Apple Developer Account.
- Under Certificates, Identifiers & Profiles, click Identifiers and ensure your App ID has Sign In with Apple enabled.
- Create a Services ID for your app (used by Firebase).
- Create a Key with "Sign In with Apple" enabled and download the `.p8` file. Note the Key ID and Team ID.
- Go to Firebase Console > Authentication > Sign-in method.
- Enable Apple.
- Under the Apple provider settings, enter your Services ID, Apple Team ID, Key ID, and upload the `.p8` file you downloaded.
3. Enable Social Login in App
Once Firebase is configured, tell your app to show the login buttons by updating config/env.props
(or env.dart if configured there):
enableSocialLogin=true
13. Setup Products on Home Page
Home page layout, banners, and product categories are managed via your WordPress Plugin or the
assets/config/en_config.json file under the "home" array. Update category IDs to match
your WooCommerce store to display products dynamically.
14. Change App Bundle ID & Other Core Settings
This app uses a centralized configuration file to manage core settings like Bundle ID, App Name, and URLs. To change your App Bundle ID (Package Name) for both Android and iOS simultaneously:
- Open the
config/env.propsfile located in the root of your project. - Locate the
packageidvariable and change it to your desired bundle ID (e.g.,com.yourcompany.app).
appname=WooStore MultiVendor
packageid=com.yourcompany.app
wordpressWeblink=https://yourwebsite.com
Once you change the packageid in this file, the app's build scripts will automatically apply it to
both Android and iOS configurations.
15. Language & Currency Settings
In lib/core/config/env.dart:
static const String wooCommerceDefaultCurrency = 'USD';
static const String wooCommerceDefaultLanguage = 'en';
To add multiple languages, add corresponding JSON files in assets/config/ (e.g.,
es_config.json for Spanish) and enable them in the config.
16. Setup Deep Linking
Deep linking allows users to share product links that open directly in your app instead of a browser. To verify
domain ownership, you must upload two files to your website's root .well-known/ folder (i.e.
https://yourwebsite.com/.well-known/).
1. Android (assetlinks.json)
Create a file named assetlinks.json inside the .well-known folder. Add this code,
replacing the package name and SHA-256 fingerprint with your app's details:
[{
  "relation": ["delegate_permission/common.handle_all_urls"],
  "target": {
    "namespace": "android_app",
    "package_name": "com.yourcompany.app",
    "sha256_cert_fingerprints": [
      "YOUR_SHA256_FINGERPRINT_HERE"
    ]
  }
}]
2. iOS (apple-app-site-association)
Create a file exactly named apple-app-site-association (DO NOT add .txt or .json extension) inside
the .well-known folder. Replace TEAM_ID and bundle ID with your Apple details:
{
  "applinks": {
    "apps": [],
    "details": [
      {
        "appID": "TEAM_ID.com.yourcompany.app",
        "paths": [ "*" ]
      }
    ]
  }
}
3. Android Setup (AndroidManifest.xml)
To ensure Android opens your app when a user clicks a link, you must update the Android Manifest.
- Open
android/app/src/main/AndroidManifest.xml - Locate the
<intent-filter>tags for deep linking (around line 40-55). - Replace
your_custom_schemeandyourwebsite.comwith your actual app scheme and domain name.
4. App Configuration
To finalize deep linking, you MUST update your deep link identifiers in the config/env.props file in the root of your project:
deeplink_scheme=your_custom_scheme
dynamic_link_domain=yourwebsite.page.link
17. Setup Google Maps API Key
To use Maps in the app (e.g., for user address selection or store locations), you must provide a valid Google Maps API Key.
- Go to the Google Cloud Console, enable the Maps SDK for Android & iOS, and generate an API Key.
- Open the
config/env.propsfile and update your key:google_maps_api_key=YOUR_GOOGLE_MAPS_API_KEY
- For iOS Setup: Open
ios/Runner/AppDelegate.swiftand paste your key inside theGMSServices.provideAPIKey()function around line 18:GMSServices.provideAPIKey("YOUR_GOOGLE_MAPS_API_KEY")
18. Enable/Disable Ratings
In lib/core/config/env.dart, set the feature flag:
static const bool enableReviews = true;
19. Change App Version
Open pubspec.yaml and find the `version` property:
version: 1.0.0+1
The number before the `+` is the visible version (1.0.0), and the number after is the build number (1), which must be incremented for every app store upload.
20. Setup Multivendor (WCFM or Dokan)
Our app fully supports both WCFM and Dokan Multivendor plugins.
In lib/core/config/env.dart, set your multivendor type:
static const String multivendortype = "dokan"; // Options: "wcfmmp", "dokan", "none"
If you use WCFM, change it to "wcfmmp". Ensure the respective REST API plugin is installed on your
WordPress site.
21. Build for Android & iOS (Release)
Android: Create APK (For Testing)
Run the following command in terminal:
flutter build apk --release
The APK will be generated at build/app/outputs/flutter-apk/app-release.apk.
Android: Create Signed AAB (For Play Store Upload)
- Create a Keystore file using Android Studio or Java Keytool.
- Add the keystore file and passwords to
android/key.properties. - Update
android/app/build.gradleto configure signing. - Run command:
flutter build appbundle --release
The AAB will be generated at build/app/outputs/bundle/release/app-release.aab.
iOS: Create IPA / Archive (For App Store Upload)
Building for iOS requires a Mac with Xcode installed and an active Apple Developer account.
- Open terminal and run:
cd ios
pod install
cd ..
flutter build ios --release
- Open the
ios/Runner.xcworkspacefile using Xcode. - In Xcode, go to the top menu and select Product > Destination > Any iOS Device (arm64).
- Click on your Runner target, go to the Signing & Capabilities tab.
- Check "Automatically manage signing" and select your Apple Developer Team.
- From the top menu, click Product > Archive.
- Once archiving is complete, the Xcode Organizer will open. Click Distribute App and follow the prompts to upload your app to App Store Connect / TestFlight.